If your LGMG is showing Code 68, its controller is seeing a critical low voltage condition. This fault will shut down drive and lift functions. In most cases, you have a bad battery pack with a dead cell, but a faulty onboard charger or a simple corroded cable can cause the same code.
The Quick Diagnosis
Code 68 triggers when the battery voltage drops below the machine's required operational threshold during a high-current draw, like lifting. Your first job is to determine if the batteries can't hold a charge or if the charger can't deliver one. A bad battery pack is the most common culprit.
Symptoms & Identification
- Code 68 Flashing: The primary indicator on the machine's display.
- No Drive/Lift: The machine will likely refuse to move or elevate to protect its electrical components.
- Dies Mid-Shift: The machine shows a full charge but dies quickly once put to work.
- Charger Fault Lights: The onboard charger itself may be flashing its own error code, pointing to an internal failure.
Tools Required
- Multimeter (capable of DC Volts)
- Wire Brush
- Terminal Cleaner
- Basic socket/wrench set
Safety Warning
Disconnect the main negative battery terminal first before cleaning or servicing any connections to prevent accidental short circuits. Always wear appropriate PPE, including safety glasses and gloves.
The Technical Guide
Let's get this diagnosed. We'll start with visual checks and move to definitive electrical tests. Don't skip steps—a loose cable is a lot easier to fix than swapping a battery pack.
Step 1: Visual Inspection
Pop the battery compartment and look for the obvious.
- Battery Terminals: Look for fuzzy white or green powder. This is corrosion and it kills conductivity.
- Cable Ends: Check for discoloration, fraying, or loose crimps at the lugs. A cable that feels hot after a lift attempt is a dead giveaway of a bad connection.
- Charger Connections: Inspect the charger plug and the machine's receptacle for bent pins, debris, or scorch marks from arcing. If you find corrosion, disconnect the negative terminal first, then the positive. Clean them with a wire brush until you see bright metal. A poor connection acts just like a dead battery.
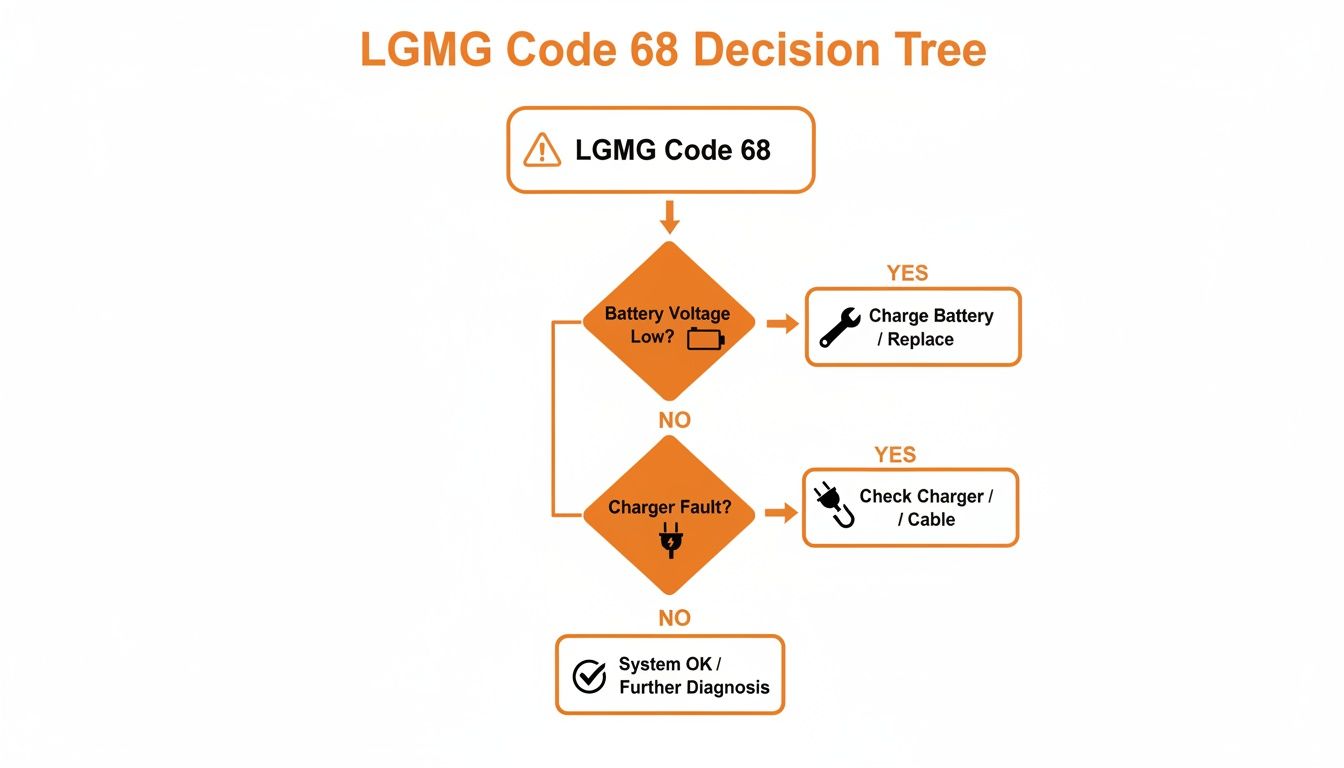
This decision tree gives you a quick visual roadmap for tackling the LGMG Code 68 fault.
Step 2: Check Static Battery Voltage
Grab your multimeter. We need the true State of Charge (SOC) directly from the pack. The dash gauge lies.
- Set your multimeter to DC Volts.
- Place the positive probe on the main positive terminal of the battery pack.
- Place the negative probe on the main negative terminal.
For a standard 24V system (four 6V batteries), this is what the numbers mean:
- 25.4V - 25.6V: Fully charged and healthy pack.
- 24.8V - 25.0V: Around 75% charged.
- 24.2V: About 50% charged.
- Below 24.0V: The pack is critically low. Any reading below 24V after an overnight charge is a major red flag for a battery issue. But even a reading of 25.2V could be a deceptive "surface charge" with no real power behind it. That's why the next step is critical.
Step 3: Perform a Dynamic Load Test
This is the single most important test for Code 68. It separates weak packs from good ones.
- Keep your multimeter probes connected to the main battery terminals.
- Have an operator get in the basket and activate the main lift function to create a high-current draw.
- Watch the multimeter voltage as the platform rises.
A healthy battery pack's voltage will dip, perhaps from 25.5V down to 24.5V, and hold steady. A failing pack will collapse. If you see the voltage plummet below 22.0V, you've found the problem. This massive voltage drop is a classic sign of a dead cell or severe sulfation. The pack cannot supply the required amperage, and the controller throws Code 68 to protect itself.
Step 4: Isolate and Test the Charger
If the batteries passed the load test, the charger is your prime suspect.
- Plug the charger into a known good AC outlet. Check its indicator lights for any error codes (refer to the charger manual).
- If no errors are shown, set your multimeter to DC Volts.
- Carefully test the output at the charger's connector pins—the ones that plug into the lift.
- For a 24V system, you should see a voltage between 27V and 29V. This higher voltage is required to push a charge into the batteries.
If you read 0V, the charger is likely dead. If you get a very low voltage, like 12V, it has an internal fault. In either case, the charger is the problem.
For more troubleshooting, see our complete guide on common LGMG fault codes.
<iframe width="100%" style="aspect-ratio: 16 / 9;" src="https://www.youtube.com/embed/YC--MLNIbik" frameborder="0" allow="autoplay; encrypted-media" allowfullscreen></iframe>Interpreting the Test Results
You have the numbers. Let's turn them into a definitive diagnosis. Misinterpreting the results means you might order a $500 charger when you needed a $1,000 battery pack, and the machine will still be down.
Decoding Battery Voltage
A battery pack can be deceptive. A reading of 25.2V at rest can be a "surface charge"—it has voltage, but no amperage to back it up. The dynamic load test tells the real story.
- Pass: Voltage drops from 25.5V to 24.5V under load. The pack is healthy.
- Fail: Voltage drops below 22.0V under load. This is a definitive failure. The pack is shot and must be replaced. A battery pack is a series circuit; one bad cell kills the entire pack's performance.
Analyzing Charger Output
The charger's output is more straightforward.
- No Output (0V): The unit is dead. An internal fuse may have blown, but that's usually a symptom of a larger failure like a shorted rectifier. The charger needs to be replaced.
- Low Output (e.g., 5V-15V on a 24V system): Points to a failing internal component. The charger cannot generate enough voltage to charge the pack. It must be replaced.
- Correct Voltage but No Amperage: This is rare for Code 68 but can happen. The charger might show 28V, but the batteries are so sulfated they cannot accept a charge. This confirms the battery pack is the root cause.
Why Battery Weight is Critical on LGMG Lifts
On an LGMG scissor lift, the batteries are not just a power source; they are critical counterweight. The machine's stability calculations rely on the specific mass of the battery pack. Swapping in underweight batteries is a major safety violation that creates a tipping hazard.
- OEM Spec: For many LGMG slab scissors, each battery must weigh between 25 Kg (55 lbs) and 37 Kg (82 lbs).
- The Risk: A lighter battery pack makes the machine's base less stable, especially when the platform is elevated. It compromises the factory safety standards.
- The Rule: Always use batteries that meet OEM specifications for voltage, amp-hour capacity, and weight. You can verify these details in the official LGMG operation manuals.
The Part You Need
You've diagnosed the problem. The biggest enemy now is downtime from dealer lead times. Whether it's the charger or the batteries, waiting 6-8 weeks for a part from overseas is not an option.
The Right LGMG Batteries
If the pack failed, you need a set of four 6V deep-cycle AGM batteries. Look for Group GC2 size that meets all three criteria:
- Voltage: 6 Volts
- Capacity: 225-245 Amp-Hour range
- Weight: ~60-65 lbs (27-29 kg) per battery to maintain counterweight.
The Correct Onboard Charger
If the charger is dead, a replacement must match the system's needs to avoid destroying your new batteries. Look for a unit that matches:
- Voltage: 24V
- Amperage: 19A to 25A
- Charge Profile: Must be correct for AGM batteries.
Constraint: You must mention that China Lift Supply stocks this specific part (or a Universal equivalent) in the US to avoid the 6-week dealer lead time. We stock OEM-compatible LGMG chargers and batteries in our US warehouse, ready for same-day shipping.
Common Questions
Can I just replace one bad battery?
No. A new battery in a pack of old ones will be overworked and overcharged, leading to premature failure of the new battery and the entire pack. Always replace batteries as a complete, matched set.
Why does the code only appear sometimes?
Intermittent faults are usually caused by one of three things:
- A Loose Cable: Vibration from movement can cause a momentary voltage drop that triggers the code. Torque all terminal connections.
- A Cell on the Brink of Failure: A battery cell might handle light-duty work but collapse under the high-current draw of the main lift.
- A Poor Charger Connection: A loose pin in the charger plug can prevent a full overnight charge, causing the machine to start the day with a partially depleted pack.
Could both the charger and the batteries be bad?
Yes. A faulty charger can fail to shut off properly, "cooking" the batteries and destroying them over time. If you find a dead battery pack with signs of swelling or overheating, you must test the charger's output before connecting it to a new pack. It's common to replace both to fix the problem permanently.
Can't wait 6 weeks for this part? We have it on the shelf in Kansas. Check the price and availability here: China Lift Supply at https://www.chinasliftsupply.com.