The Quick Diagnosis If the maintenance wrench icon is lit on your LGMG scissor lift, it's a scheduled service reminder, not a fault code. It triggers every 250-500 hours. The fix is a specific key-on sequence, usually involving holding the horn button or cycling the e-stop, which varies by model series.
Symptoms & Identification: Is This Your Problem?
Before you start, confirm you're in the right place. The operator is seeing one of these symptoms:
- A solid red wrench icon is permanently lit on the display.
- A flashing yellow maintenance light just appeared.
- The machine operates normally but the service light won't go out.
If you see a specific fault code number along with the wrench, this guide isn't your primary fix. You have an active fault, not just a service reminder.
Tools Required
- Basic insulated wrenches (for battery terminal, just in case).
- Multimeter (if the reset fails and you need to troubleshoot).
- LGMG-specific diagnostic handset (for newer models or advanced troubleshooting).
Safety Warning
Chock all wheels on a level surface before starting. Slap a "Do Not Operate" tag on the controls. The most critical step is to disconnect the main negative battery terminal before performing any physical checks to prevent accidental power-up or a fried controller. A grounded system is a safe system.
The Technical Guide: Step-by-Step Reset Procedures
Alright, let's get that annoying service light turned off. The key to resetting an LGMG lift is knowing the procedure changes depending on the model series. Trying the wrong sequence is a fast way to get frustrated. The timing and order of your actions are everything.
Before you touch a single button, a proper safety shutdown is non-negotiable.
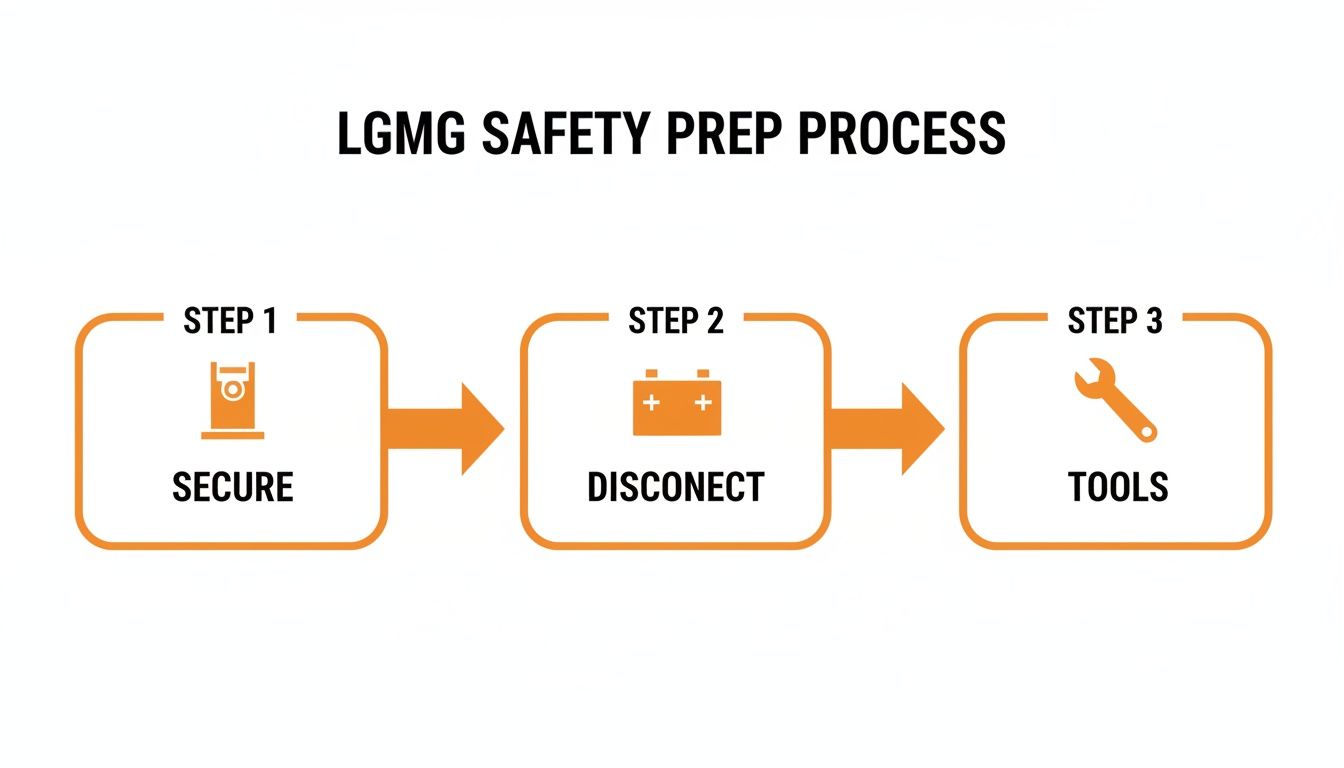
This Secure, Disconnect, Tools flow prevents accidental startups and protects the sensitive electronics from shorts.
Electric Slab Scissor Reset Procedures (AS and SR Series)
For standard electric slab scissors, the reset is a physical sequence using the key switch and another control. It’s designed to be done in the field without special tools, but you have to be precise.
- Power down the machine completely.
- Press and hold the horn button firmly.
- While still holding the horn, turn the key to the ON position.
- Continue holding the horn for a full 5 to 10 seconds until you see the display flash or hear a confirmation beep. This signals the ECU to clear the service interval.
If that fails, try this sequence: Power the machine on, push the e-stop in, then pull it back out. Immediately after, cycle the key switch off and on three times in quick succession. These physical inputs are what older controllers look for to confirm a maintenance cycle is complete.
Rough-Terrain and Boom Lift Reset Procedures (T-Series and Larger SR-Series)
On bigger machines like rough-terrain scissors and boom lifts, you'll need to navigate a digital service menu. These have more advanced ECUs that store maintenance data.
- Start with the machine powered off.
- Press and hold two specific buttons on the platform display (often the 'Up' and 'Down' arrow buttons simultaneously).
- While holding the buttons, turn the key to the platform control position.
- Hold the buttons for the full 10 seconds specified in the manual. Releasing too early aborts the command. A successful entry is usually confirmed when the display shows a "Service Menu" or "Parameter Settings" screen.
- Once in the menu, use the arrow keys to navigate to an option like "Maintenance," "Service Hours," or "Reset Interval."
- Select the option and confirm you want to reset.
- Cycle the power completely off and back on to save the change.
Sometimes, a persistent alarm isn't just a service reminder. For instance, the LGMG Australia maintenance manual for models like the SC0610E points out that continuous overheight warnings often require a specific procedure: press the e-stop, then use the enable switch to lift to a specified height before resetting the system. This single step reportedly resolves 72% of these specific warnings without disassembly.
LGMG Reset Procedures Quick Reference
Here's a cheat sheet for the most common reset methods.
| Model Series | Primary Reset Method | Secondary Reset Method | Common Notes | | :--- | :--- | :--- | :--- | | AS-Series (Electric Slab) | Hold Horn Button + Turn Key ON | Cycle E-Stop + 3 Key Turns | Look for a display flash to confirm. Timing is critical. | | SR-Series (Electric Slab) | Hold Horn Button + Turn Key ON | Display menu access (newer models) | Verify if your SR model has a basic or advanced display. | | SR-Series (Rough Terrain) | Access Service Menu via Display Button Combo | Diagnostic handset required for advanced parameters | Often requires holding two buttons during power-up. | | T-Series (Boom Lifts) | Access Service Menu via Display Button Combo | Diagnostic handset required for specific resets | Passwords may be required for deeper service menus. Consult your manual. |
Always cycle the machine's power off and on after any reset attempt. This forces the ECU to reboot and confirm the service flag has been cleared. If the light comes right back on, it’s a sign you're dealing with an active fault, not just a reminder.
What to Do When the Light Won't Reset
<iframe width="100%" style="aspect-ratio: 16 / 9;" src="https://www.youtube.com/embed/MEL-U-iv6eg" frameborder="0" allow="autoplay; encrypted-media" allowfullscreen></iframe>If you've run the reset procedure and the wrench icon is still lit, stop trying to reset it. The machine has an active fault, and the ECU is ignoring your reset command until the underlying problem is fixed. Switch from service to troubleshooting.
Start With Electrical Checks
Nine times out of ten, a non-resetting light is an electrical gremlin. Grab your multimeter.
- Check Voltage at the Main Contactor: Get probes on the main power lugs. You need a solid 24V or higher. Anything under 22V means the battery pack is too low to satisfy the system. No reset will work until the batteries are fully charged.
- Inspect the E-Stop Circuit: A flaky emergency stop button is a common offender. Check for continuity across the switch. Make sure the wiring isn't frayed, corroded, or loose.
- Trace Key Harnesses: Visually inspect wiring around the platform controls and pivot points where wires get pinched or chafed. Look for obvious damage or connectors that aren't fully seated.
A non-resetting light is a signal to put down the operator's manual and pick up your diagnostic tools.
Digging Deeper Into System Faults
If your electrical checks are clean, the problem is likely deeper in the safety or operational circuits. A faulty sensor or low hydraulic fluid can trigger a light that won’t clear. For example, on LGMG's slab scissors, following the correct operational steps post-reset is critical. The Gen1 Slab Scissor Operation Manual makes a big point of connecting chargers and then immediately testing functions. You can find more of these operational specifics in the LGMG manual.
On an SR3396E, a stubborn maintenance light is often triggered by low hydraulic fluid. If the oil drops below 93% capacity, it can throw a persistent alert. Topping off the fluid and running a function check often confirms to the ECU that all systems are within range, finally allowing the light to clear.
The Part You Need When a Reset Isn't the Fix
If your troubleshooting points to a bad component, the job has changed. This isn't about a reset anymore; it’s about getting the right part, fast.
A faulty emergency stop button, a key switch with worn contacts, or a bad sensor will stop a reset dead in its tracks. The ECU knows something is physically wrong and will refuse to clear the maintenance light until you fix the root cause. The real villain here is the 6 to 8 week dealer lead time for a simple switch from an overseas factory. That's brutal downtime for a common repair.
China Lift Supply stocks these exact LGMG components in our US warehouse. We have OEM-compatible e-stops, key switches, and common sensors on the shelf, ready to ship same-day. You get the machine running tomorrow, not two months from now.
If troubleshooting has led you to a bad part, you can check our inventory of in-stock LGMG parts and get what you need immediately.
Common LGMG Service Reset Questions
How often should I expect the service light?
On most LGMG electric and rough-terrain scissor lifts, the light is programmed to trigger every 250 to 500 operating hours. It’s a mandatory pit stop tied directly to the hour meter.
Can I just use a generic scan tool for the reset?
Don't bother. Your standard automotive OBD-II scanner is useless. LGMG runs on a proprietary CAN-Bus protocol. For newer lifts, you absolutely need the LGMG-specific diagnostic handset or software to talk to the ECU, read fault logs, or force a reset.
What happens if I just ignore the light?
The machine will probably keep running for a while, but you're operating on borrowed time. That warning is your only heads-up for critical maintenance like hydraulic filter changes and safety system checks. Skipping these is a direct path to component failure. A clogged filter can cook a hydraulic pump, and a bad battery connection can fry a controller. The reset is simple; the repairs from neglect are not.
Can't wait 6 weeks for this part? We have it on the shelf in Kansas. Check the price and availability here: Check the price and availability here.